Originally published in PhotoMedia Magazine CURRENT ISSUE, GREAT GEAR, SPRING 2011 — BY RIC KASNOFF ON APRIL 3, 2011 AT 7:11 PM
 Not all that long ago, flying with camera gear to a location for a shoot was fairly painless and could even be considered fun most of the time. Flash a business card or a photo organization membership card, and you were easily able to skirt the baggage limits. Slip the curbside baggage handler a $20 bill, and you could get all the bags you wanted on for free. Sadly, those days have disappeared with the advent of the Transportation Security Administration (TSA), baggage fees and oversold flights.
 As someone who flies for 80 percent of my work as a photographer, PhotoSafari trip leader and trainer, I had to figure out a way to get what I needed onto the airplane with me without breaking the bank or risking having it disappear during the flight. I realized that as the space on airplanes had shrunk, my gear load had grown. Not only was I packing my normal complement of still photo gear, I was also packing a full-size video setup to increase my income opportunities.
 So last year I embarked on a challenge: to streamline my baggage and equipment to fit in the overhead space of the most common airplanes, yet also ensure that I had what I needed to get the job done when I arrived. As luck would have it, this was also around the time when two other fortunate events occurred: 1) Nikon finally released a 1080p full-HD-capable camera, and 2) I had a break-in and theft at my studio.
Now, to most folks a break-in and theft might not sound like “luck,” but what was stolen was an older Sony FX1 setup — a nice camera but a little out of date and a bit cumbersome to travel with. For someone like me with a bad case of GAS (Gear Acquisition Syndrome), the opportunity to dive into the HD-SLR market and create a one-bag “convergence” kit was too good to pass up.
To begin, I made a list of the things I absolutely needed for the typical shoot on the road:
– Two camera bodies; at least one video-capable
– Batteries, cords, cables and chargers
– Lenses covering whatever I was shooting
– Shoulder stabilization
– Tripod and fluid head
– Monitor and loupe
– Follow focus
– Filters
– Portable fill light
– Portable sound recording device
 Fortunately, I already had several pieces and parts of this complex puzzle in hand: my Nikon D3s and two D7000s; a set of Nikon Pro Zoom lenses; a recently acquired Dp6 monitor by smallHD that I’ve become addicted to for general shooting; the amazingly crisp and sharp Zacuto Pro3 loupe for action shots; a nice, light set of Manfrotto mag-fiber tripod legs with a 502 fluid head; a great composite stabilizer shoulder rig from Shape wlb; a Zoom H4n portable recording device, to make up for the less-than-optimum sound quality of most DSLRs; and my favorite camera bags, the ThinkTank Airport Security roller and backpack and the Airport Accelerator backpack.
Next I took on the task of determining what gear I had to leave behind in this new one-bag configuration. Using an upcoming Photosafari trip to Japan as a gauge, I was able to define the situations under which I’d most likely be shooting and narrow my lenses to three Nikon Pro Zooms.
 While I love my trusty D3s, I gritted my teeth and decided to limit the camera bodies to the D7000s. Testing of the early-release Nikon D7000s showed them to be capable of producing very marketable still images as well as gorgeous video files. Plus, the memory cards, batteries, chargers and accessories used by the D7000s took up a lot less space than the D3s. Also, unfortunately my ShapeWLB Composite shoulder rig was too well built (read “beefy”) and didn’t break down far enough to fit into a “one-bag” kit.
PhotoPlus shopping spree
To complete my shopping list, I was down to finding a smaller shoulder rig, follow focus and fluid head to fit in the remaining space. Off to PhotoPlus Expo! After visiting with my old pal Bill Fortney, from Nikon Pro Services, to discuss a few “run and gun” rigs, I went to see Wayne Schulman, the sales and product manager for video at Manfrotto, to look for the lightest, smoothest and most stable components for my weight and size limitations. He eventually agreed that, because I was schlepping the gear up mountainsides, my old faithful mag-fiber legs should be OK, if they were paired with Manfrotto’s lightweight 701HDV fluid head.
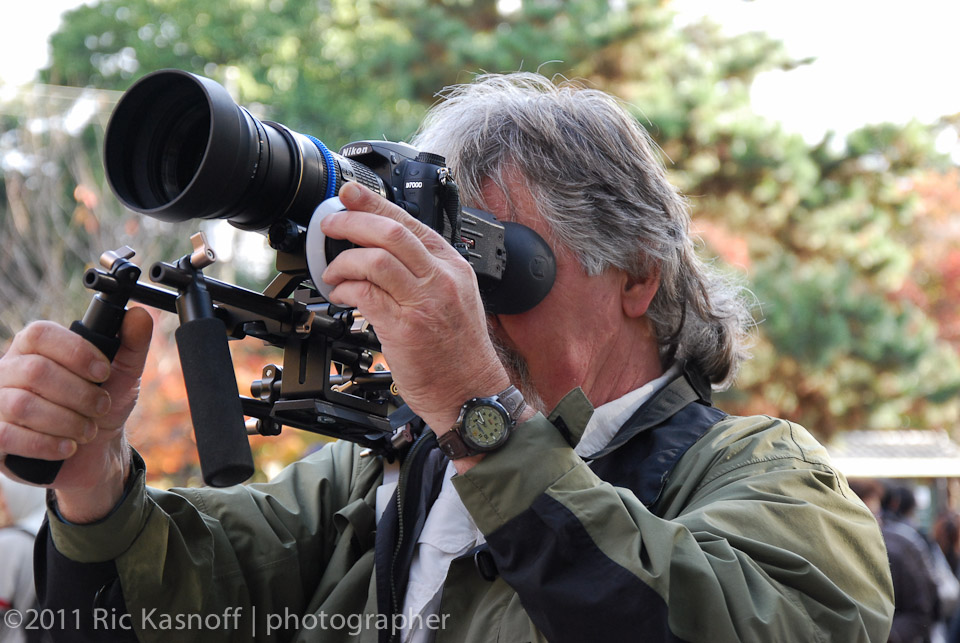
 At the Genus Tech booth, I spoke with technical consultant Mark Blaker about my need for a more compact shoulder rig than the ShapeWLB Composite Rig I currently own. (I was already familiar with the company through my use of their amazing “Fader ND” variable ND filter) After looking at a prototype of a Genus Tech field rig that they were about to release, I fell in instant lust (there’s the GAS kicking in again). Small and light, it was more of a gunstock-type device than a traditional shoulder rig, developed especially for the HD-SLR market. Traditional 15mm rods, adjustable hand grips and a special HD-SLR base plate formed the core of the rig, while a seemingly infinitely adjustable shoulder/chest piece provided another point of contact and stabilization.
Mounting a D7000 fitted with the gold-standard Zacuto Z finder Pro3 loupe and their very cool Bravo follow focus gave me yet another point of contact — four points, to be exact. But the entire setup was still lightweight and, when all the pieces were assembled, very sturdy. Better yet, when it was broken down, it was equivalent to the size of a Quantum Trio Speedlight and a 2×2 battery pack in my camera bag. I wanted one.
Although the projected release date for the prototype was to be well after my PhotoSafari to Japan, the kind folks at Genus Tech decided that the unit needed to be “field tested” some more and arranged for me to get a pre-production test unit before my trip.
Travel kit ABCs
When I got back to Seattle, I began the hours-long process of laying everything out to see how it would fit. I finally decided I would need to come up with three basic kits to fit every “what if” scenario I could imagine:
My A kit — For times when I was limited to one bag on conventional-size airplanes and trains. Includes full still and video shooting gear with destination- and subject-specific lenses and accessories. Built around the ThinkTank Airport Security combination roller and backpack.
My B kit — For quick trips flying on smaller planes and hiking a lot. Includes minimal still and video shooting gear. Built around the ThinkTank Airport Accelerator backpack.
My C kit — For the times where I had an assistant (read: Sherpa) and/or a shipping budget and needed lights and modifiers in addition to my “A kit” gear. Includes both ThinkTank bags, plus a light kit bag containing lightweight lights, stands and modifiers. Built around a ProFoto custom light case or a Pelican rolling case.
While playing with the Genus rig in my studio in preparation for the trip, I discovered a novel modification. When I rotated the shoulder brace down and out of the way, it exposed the open end of the 15mm support rod. This seemed to be a convenient place to insert the shaft of an umbrella — the perfect size, in fact, to accommodate a ProFoto white vinyl umbrella that happened to be nearby. The white umbrella became a late addition to the kit, saving me from bringing along the golf umbrella, various clamps and grip equipment that I had been using for rain protection.
Road test in Japan
 The rain protection would soon come in handy during the Japan Photosafari trip. On departure day, the convenience and portability of having only one gear bag was evident from the start. Checking in a standard rolling bag with my clothes, tripod legs and a ProFoto umbrella left me with only the ThinkTank bag and my ThinkTank Urban Disguise 60 laptop case. I had no hassles from the TSA or the gate agents. The gear bag fit easily into the overhead while my laptop went under the seat.
One mistake I did make was to assume that the standard roll-on for my clothes and toiletries would be better suited to travel in ultra-modern Japan than would a backpack-style roller bag. This proved to be the one issue I needed to rethink, as negotiating stairs and getting on and off trains proved to be a little awkward. But the one-camera-bag concept worked well as we traveled from Narita Airport to three different trains, a car and then a muddy hike to the Jigokudani Monkey Park in the Japanese Alps.
The rain protection would soon come in handy during the Japan Photosafari trip. On departure day, the convenience and portability of having only one gear bag was evident from the start. Checking in a standard rolling bag with my clothes, tripod legs and a ProFoto umbrella left me with only the ThinkTank bag and my ThinkTank Urban Disguise 60 laptop case. I had no hassles from the TSA or the gate agents. The gear bag fit easily into the overhead while my laptop went under the seat.
One mistake I did make was to assume that the standard roll-on for my clothes and toiletries would be better suited to travel in ultra-modern Japan than would a backpack-style roller bag. This proved to be the one issue I needed to rethink, as negotiating stairs and getting on and off trains proved to be a little awkward. But the one-camera-bag concept worked well as we traveled from Narita Airport to three different trains, a car and then a muddy hike to the Jigokudani Monkey Park in the Japanese Alps.
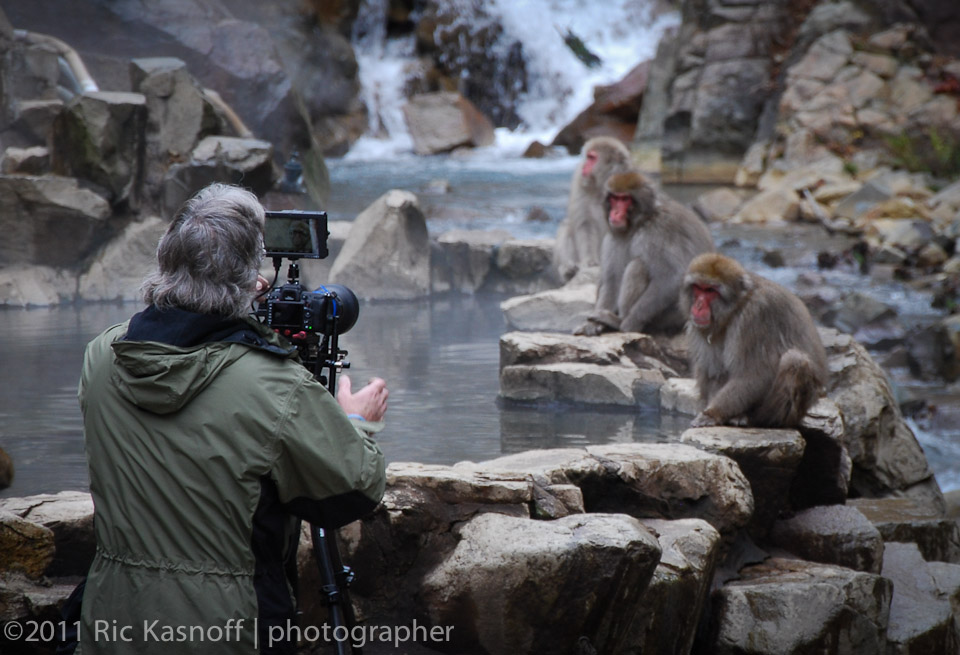
During the two-kilometer hike, at a minimum 30-degree grade, there were parts of the trail where I could roll my ThinkTank bag and others where it was necessary to don it like a backpack. Either way, the ThinkTank earned my praise. Arriving at the first onsen, or hot spring, setup of the still and video systems went smoothly, with all needed parts and pieces handy and in good shape despite all the changes and travels.
For the rest of the following week, as we toured through central and southern Japan, the gear I chose was up to the task of multiple setups and configurations for still and video, and reasonable as far as weight and size went, even when being hauled up and down muddy trails in wet conditions.
 I was especially happy with the quality of still and video files from the little D7000s; for cameras that are advertised as “prosumer,” they sure proved to be pro-quality, versatile delights that never burped once, no matter how wet or cold the weather. The other part of the kit that made a world of difference was the smallHD DP6 monitor. Its size, HD output, ruggedness and wealth of features (focus assist, peaking, false colors, and so on) — along with the fact that it allows me to maintain my area awareness and sense developing situations — made shooting a very pleasant experience.
Since the Japan trip I’ve proven the “convergence kit” on shoots in Seattle, Miami, Tacoma, Wash., and Los Angeles. I plan to use it again, without any equipment changes, for upcoming trips to Texas, Iceland and possibly Mexico.
Learning from experience
 There were, however, two things I will definitely add to the kit next time around, and another that I’ll probably include.
First on the “definite” list is a set of Switchblade portable flags and reflectors. These small (18 x 24-inch), multipurpose kits collapse into the size of a medium umbrella and contain unique folding frames with reflectors and diffusers that would give me new dimensions of control over various lighting situations, especially for portraits done with LED lights.
There were, however, two things I will definitely add to the kit next time around, and another that I’ll probably include.
First on the “definite” list is a set of Switchblade portable flags and reflectors. These small (18 x 24-inch), multipurpose kits collapse into the size of a medium umbrella and contain unique folding frames with reflectors and diffusers that would give me new dimensions of control over various lighting situations, especially for portraits done with LED lights.
Second, I’d sacrifice a pair of pants and some socks to fit in a Glidecam 2000HD Steadicam stabilizer. (Update: Got it! Review coming soon)
For the probables list, I can make an argument to include a small camera slider. This simple device has the capability (in the right hands) of adding tons of production value to a shoot for not very much money. (update: Got one! see my Cinevate Pegasus review)
I recently spent a few days learning about sliders and many other kinds of equipment with Gayle Tattersall, the director of photography for the TV show “House M.D.” and the first person to use all HD-SLRs to film an entire episode of a major network show. Speaking of learning, no matter what your experience level is, if you’re embarking on a voyage to master this new “convergence” medium, I recommend Tattersall’s three-day HD-SLR workshop, which is one of the best ways to learn the HD basics and beyond. You get to see and experience all of the tools needed to optimize these new HD-SLRs while learning from a group of friendly pros. Best of all, you get to peek into the mind of a master photographer who loves to teach and share.
Of course, if I don’t watch it, these and the addition of a few more small lights are threatening to put me back in multi-bag territory again. Unless my daughter-in-law will allow my son, Ian, to play Sherpa for me again, it’s good to know I can pack one reasonably sized bag and still be fully equipped to shoot stills and videos on the road.